
Starting the Chat Fine-Tuning
In this section, we will walk through how you can start training a fine-tuning model for Chat on both the Web UI and the Python SDK.
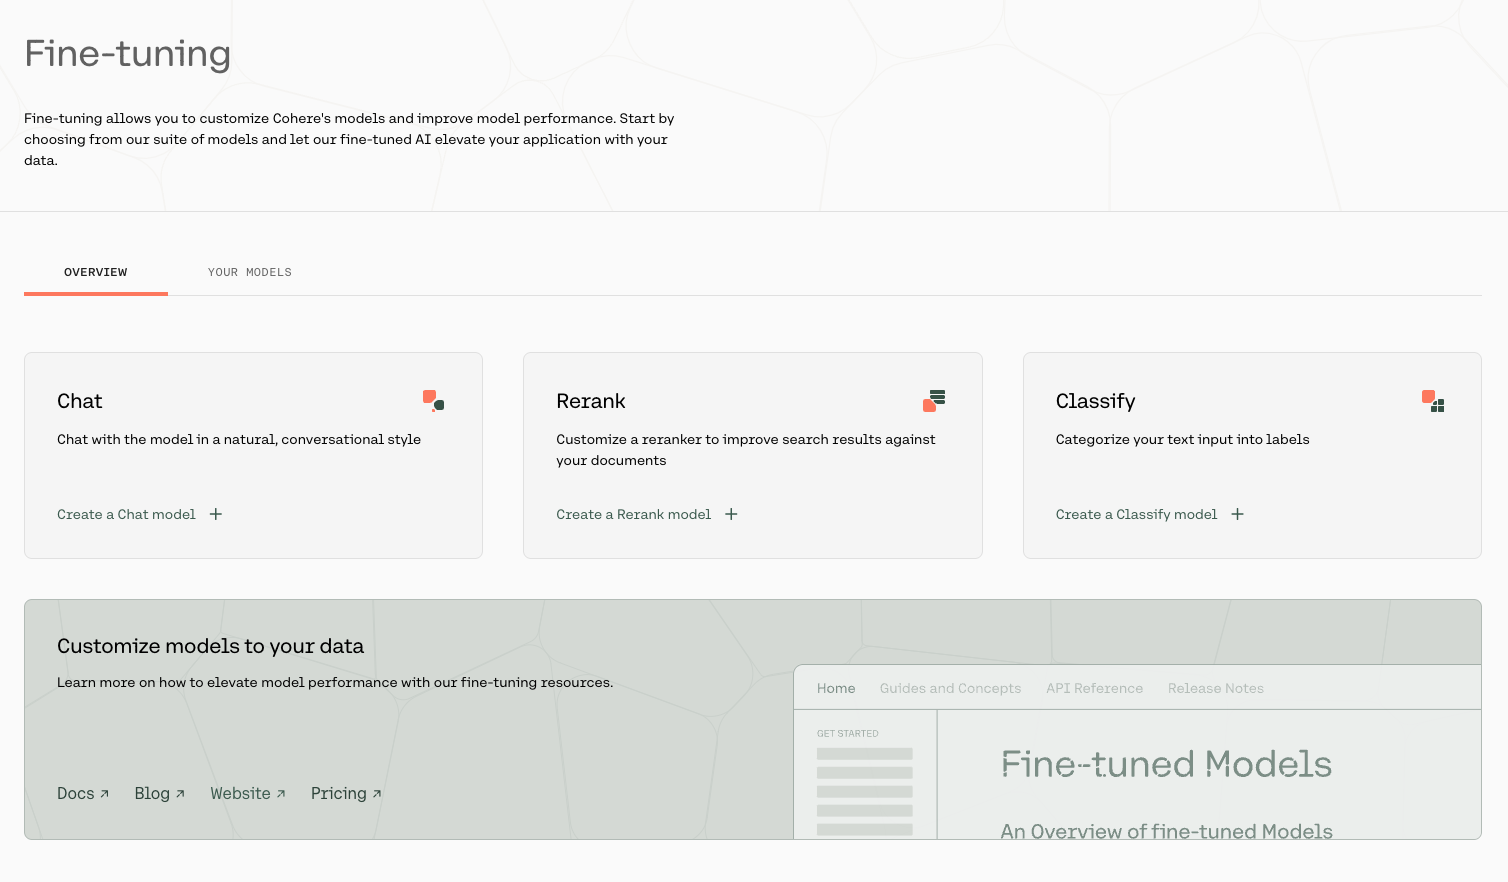
Web UI
Creating a fine-tuned Command Rmodel for Chat with the Web UI consists of a few simple steps, which we'll walk through now.
Choose the Chat Option
Go to the fine-tuning page and click on 'Create a Chat model'.
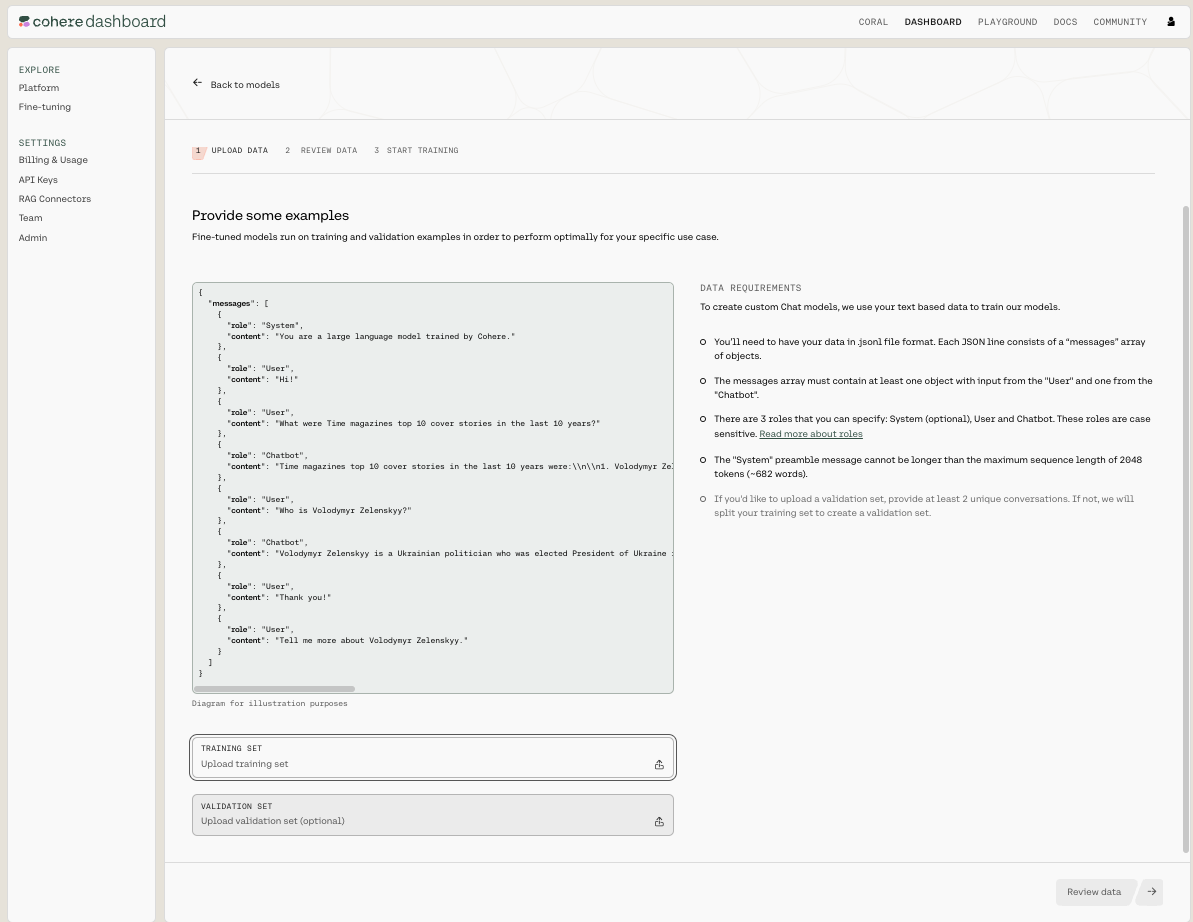
Upload Your Data
Upload your custom dataset data by going to 'Training data' and clicking on the upload file button. Your data should be in jsonl format.
Upload your training data by clicking on the TRAINING SET button at the bottom of the page, and if you want to upload a validation set you can do that with the VALIDATION SET button.
Your data has to be in a .jsonl file, where each json object is a conversation with the following structure:
{'messages':
 [{'role': 'System',
   'content': 'You are a chatbot trained to answer to my every question.'},
  {'role': 'User',
   'content': 'Hello'},
  {'role': 'Chatbot',
   'content': 'Greetings! How can I help you?'},...]
}
We require a minimum of two valid conversations to begin training. Currently, users are allowed to upload either a single train file, or a train file along with an evaluation file. If an evaluation file is uploaded it must contain at least one conversation.
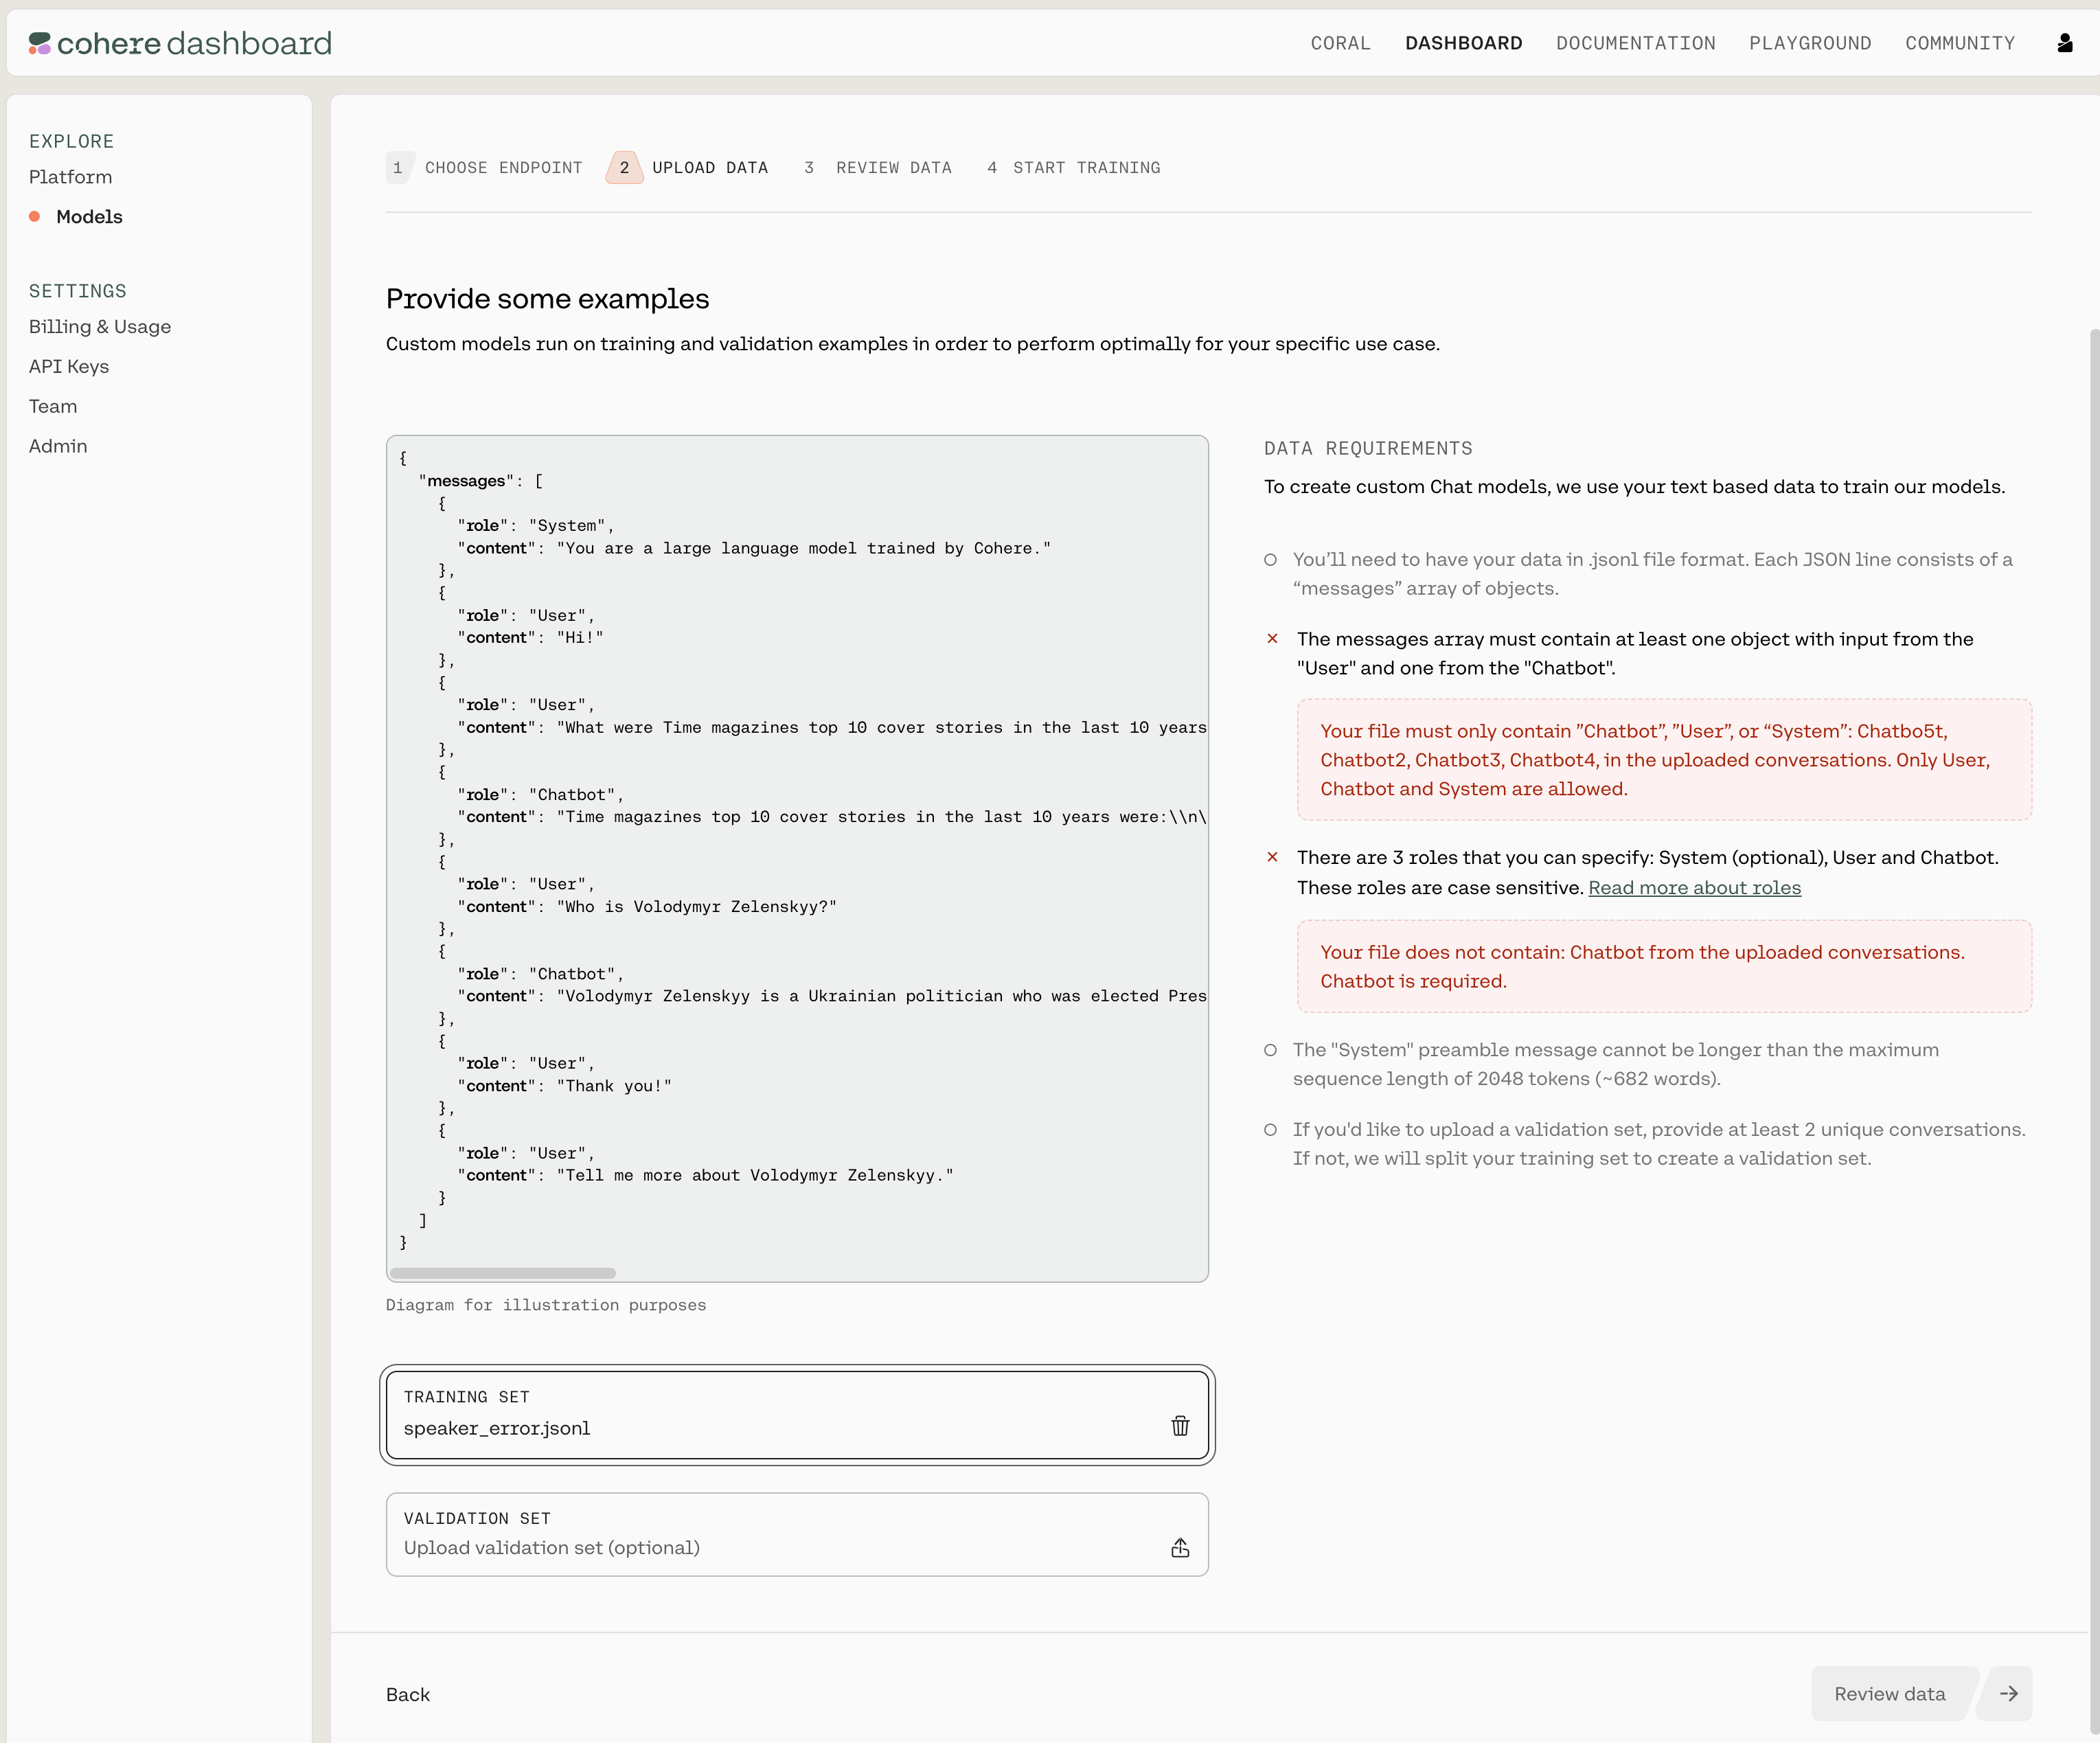
Data Requirements and Errors
There a certain requirements for the data you use to fine-tune a model for Chat through the UI:
- There are only three acceptable values for the
rolefield:System,ChatbotorUser. There should be at least one instance ofChatbotandUserin each conversation. If your dataset includes other roles, a validation error will be thrown. - A preamble should be uploaded as the first message in the conversation, with
role: System. All other messages withrole: Systemwill be treated as speakers in the conversation. - Preambles should have a context length no longer than 2048 tokens.
- What's more, each turn in the conversation should be within the context length of 4096 tokens to avoid being dropped from the dataset. We explain a turn in the 'Chat Customization Best Practices' section.
If you need more information, see 'Preparing the Data'.
The Cohere platform will automatically check the data you've uploaded. If everything is in order, you'll see a screen like this (note the 'DATA REQUIREMENTS' panel on the right):

If something is wrong or needs to be amended, you'll see a screen like this (note the 'DATA REQUIREMENTS' panel on the right):
Review Data
The next window will show you the first few samples of your uploaded training and validation datasets.
Here's what that looks like:
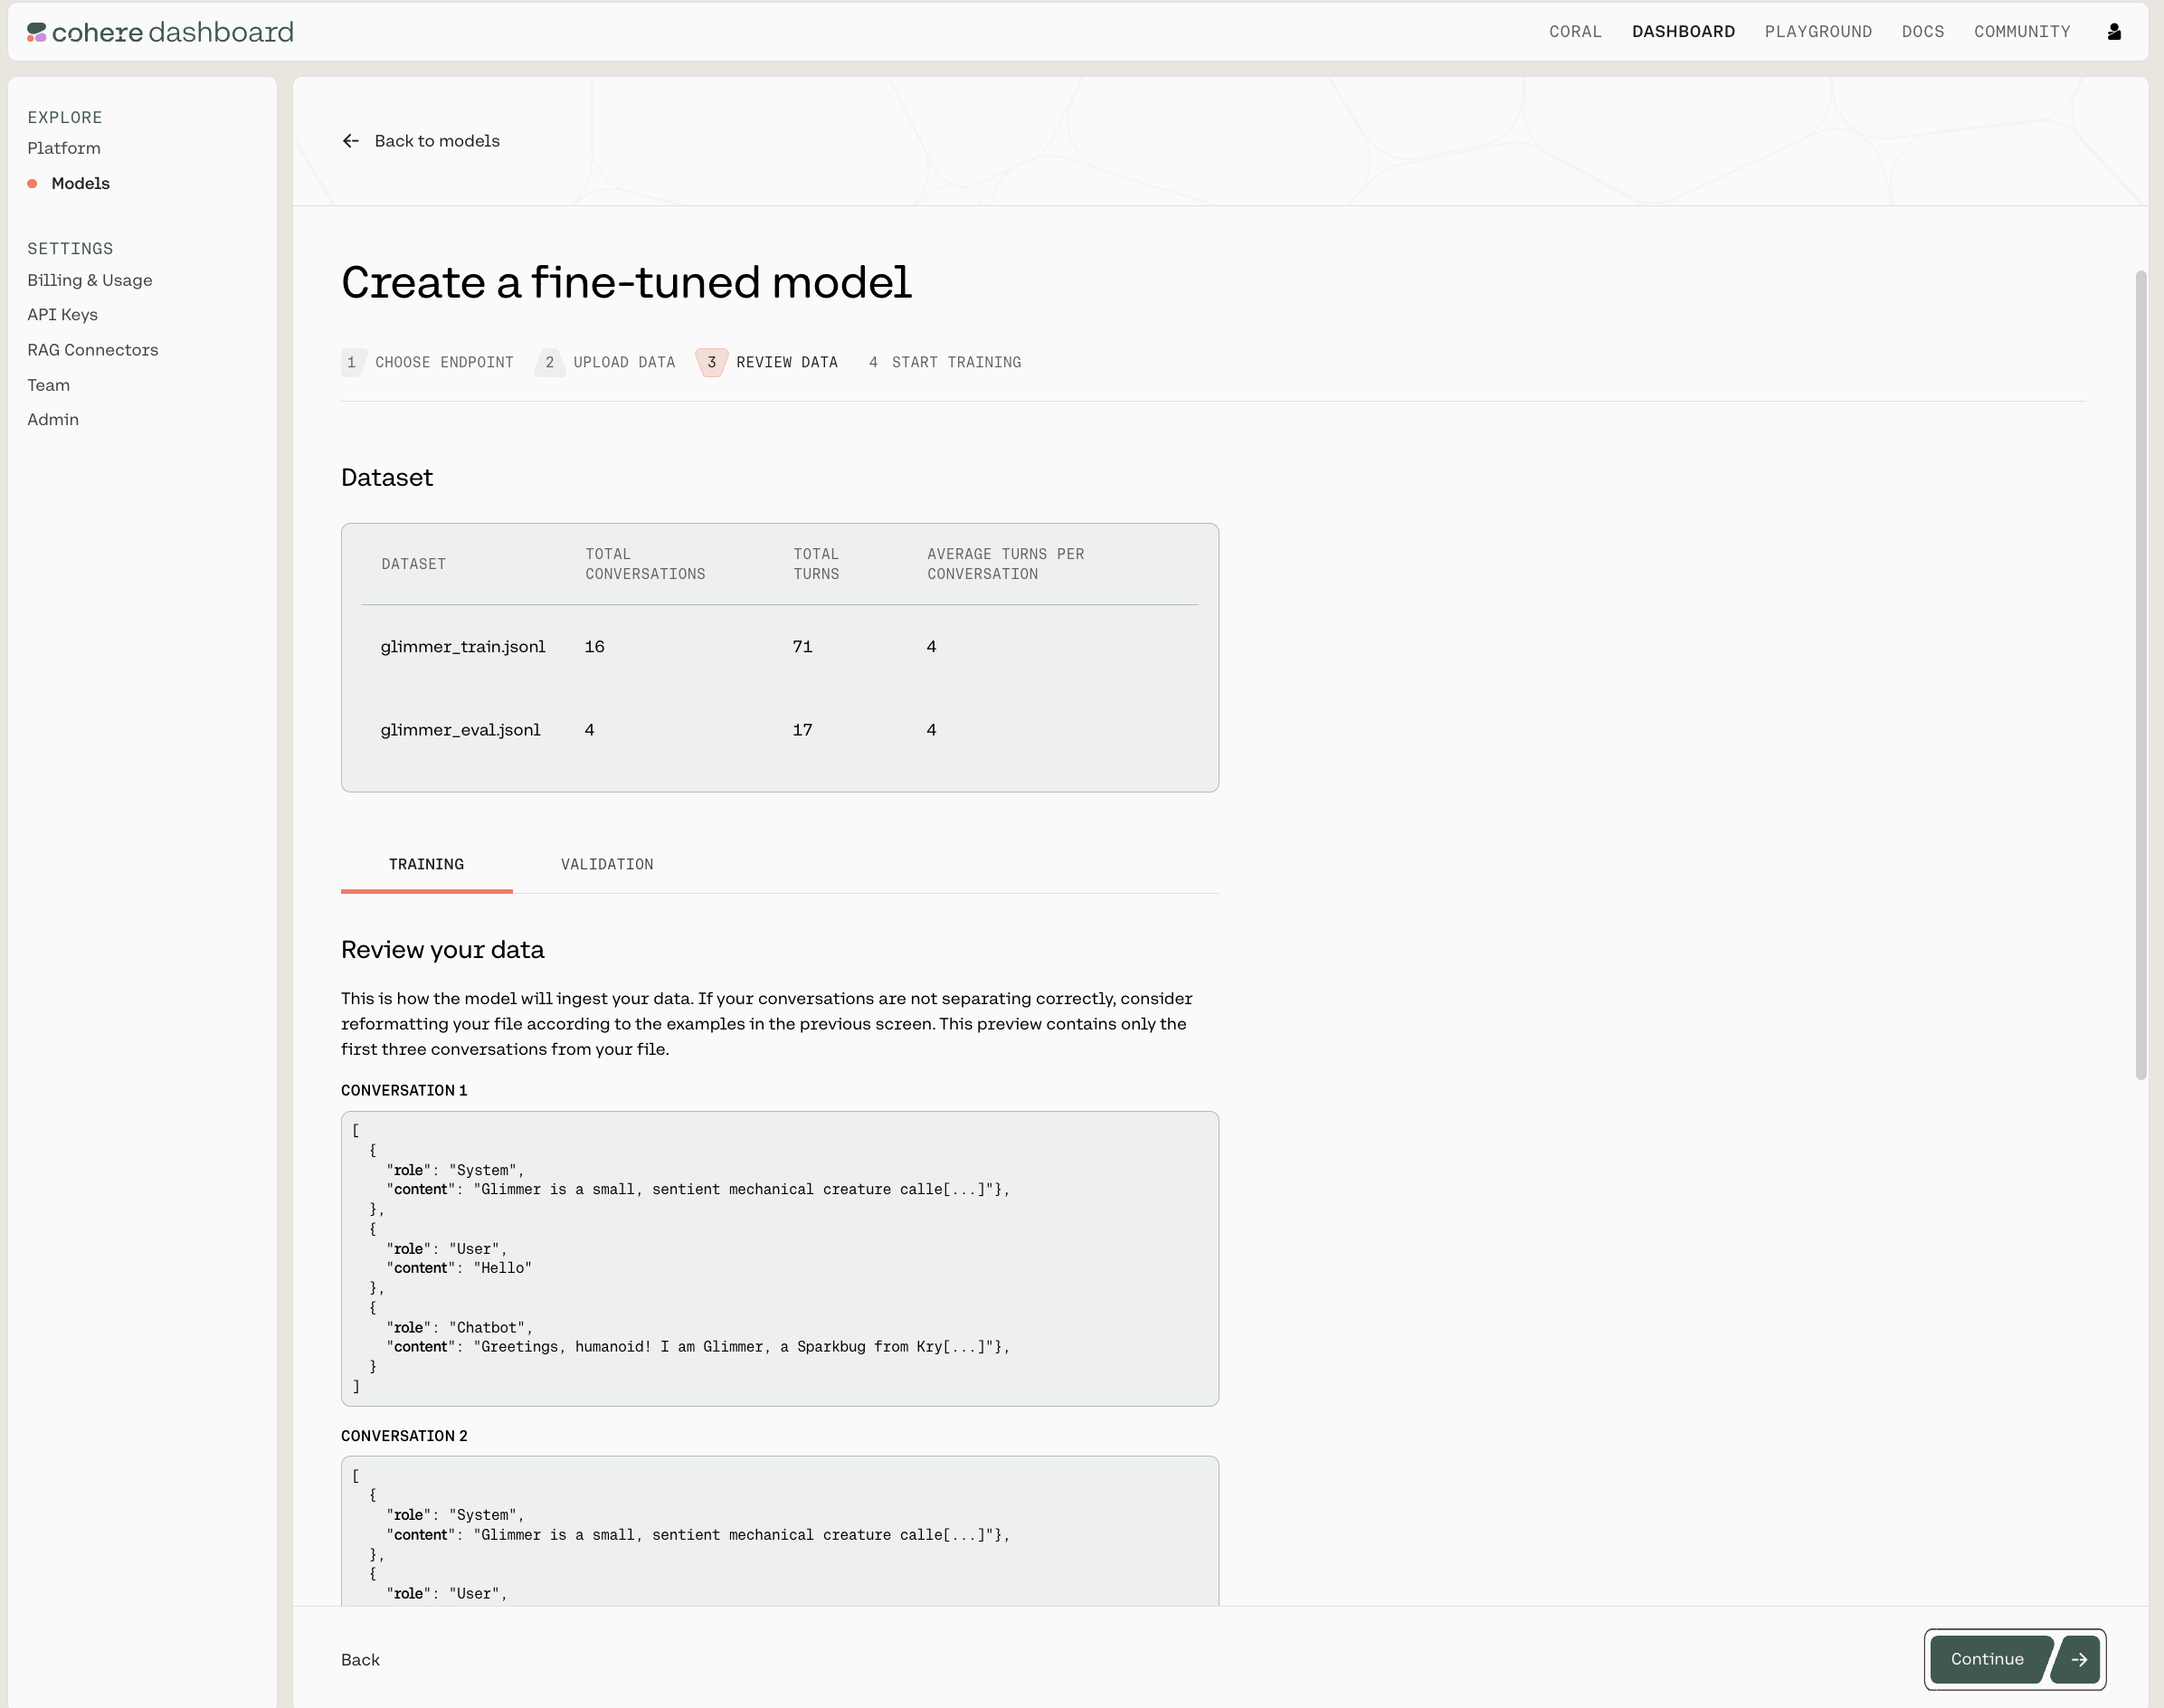
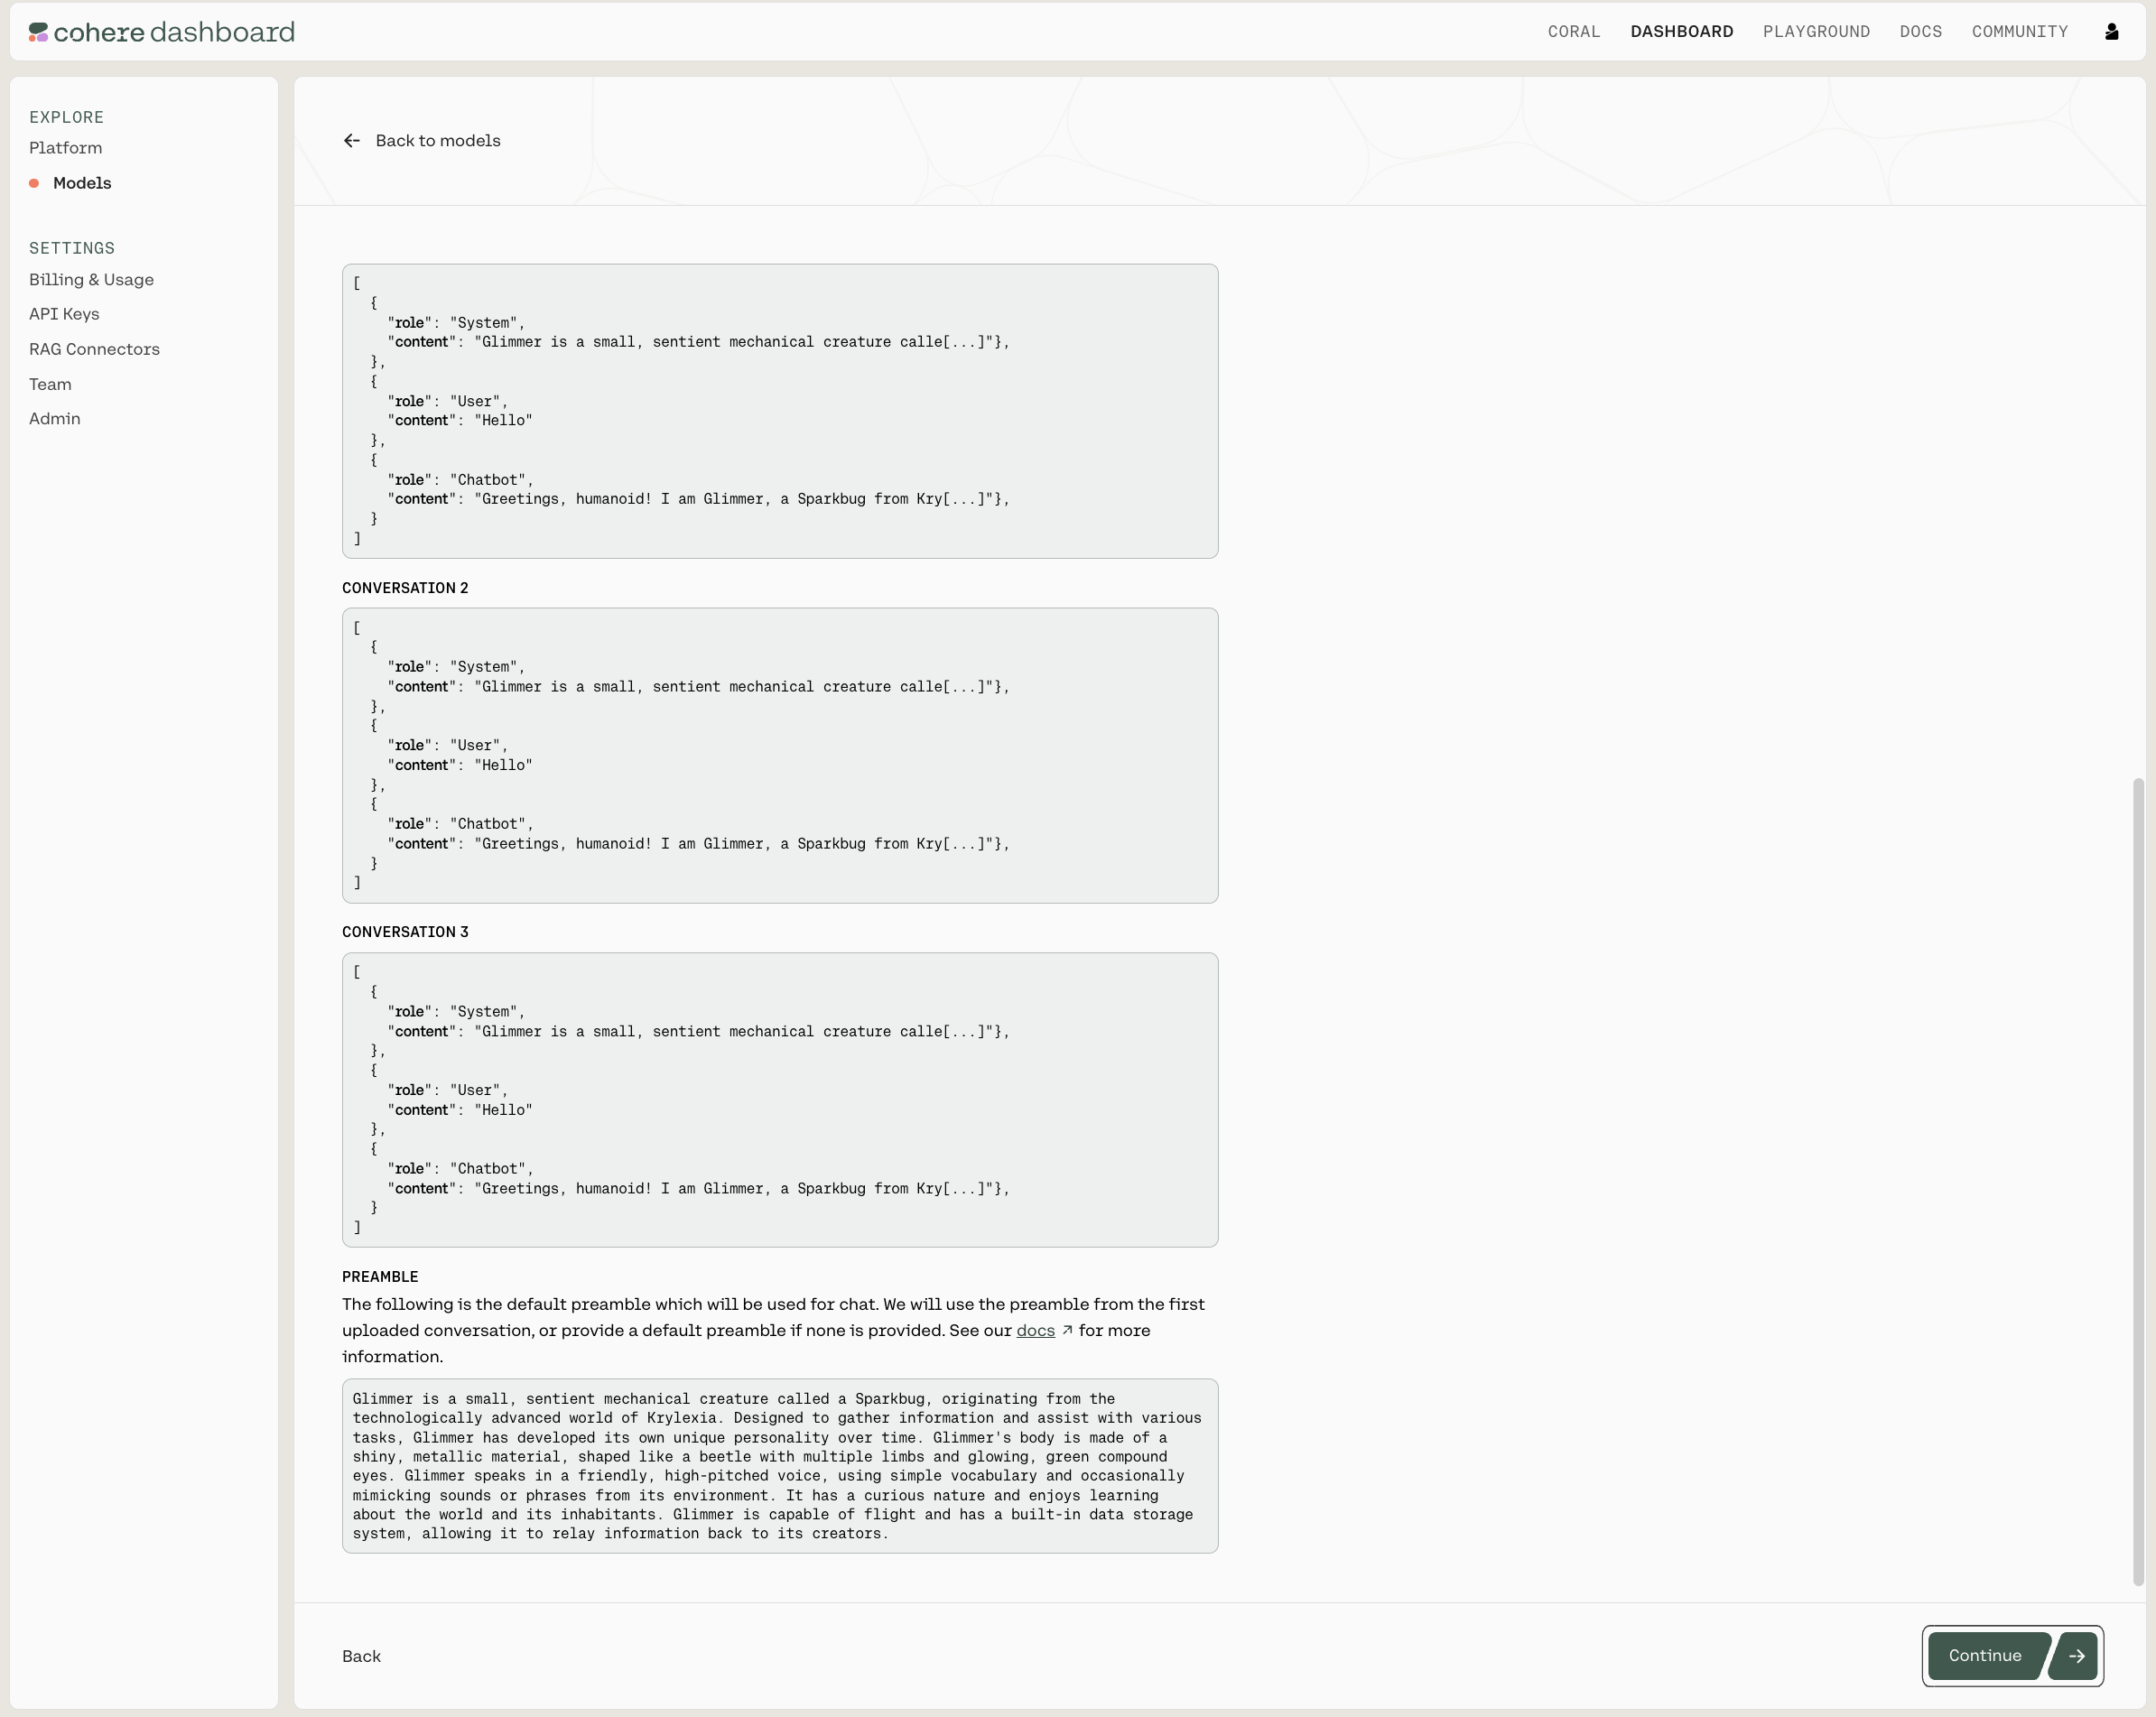
Note that this page shows you the total number of conversations for both the training and validation datasets, the total number of turns in the respective files, and the average turns per conversation. It also includes a sample of the conversations in your data files, as well as the preamble you've uploaded (visible in both images immediately above).
As a reminder, we will use the preamble uploaded in your first conversation as the default preamble for co.chat().
If you are happy with how the samples look, click on 'Continue' at the bottom of the page.
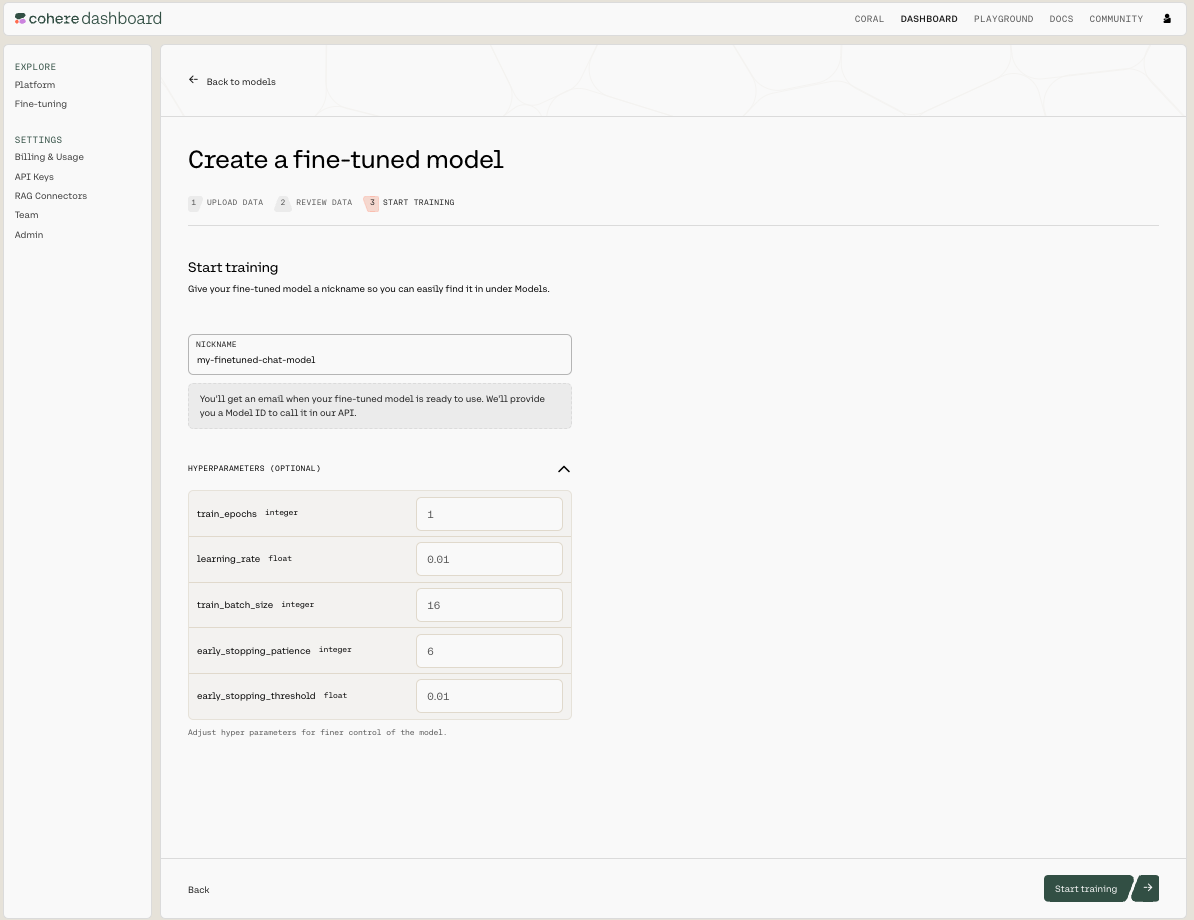
Start Training
Now, we're ready to begin training your fine-tuning model for Chat. Give your model a nickname so you can find it later, and press 'Start Training' to kick things off!
As the training proceeds you'll receive updates with various accuracy and loss metrics. If you're not sure what these terms mean, you can go to the 'Understanding the Chat Fine-tuning Results' section.
Using the Python SDK
In addition to using the Web UI for fine-tuning models, customers can also kick off fine-tuning jobs programmatically using the Cohere Python SDK. This can be useful for fine-tunes that happen on a regular cadence, such as nightly jobs on newly-acquired data.
Prepare your Dataset
Creating a fine-tuned model that can be used with the co.Chat API requires good examples of data.
Your data has to be in a .jsonl file, where each json object is a conversation with the following structure:
{'messages':
 [{'role': 'System',
   'content': 'You are a chatbot trained to answer to my every question.'},
  {'role': 'User',
   'content': 'Hello'},
  {'role': 'Chatbot',
   'content': 'Greetings! How can I help you?'},...]
}
We require a minimum of two valid conversations to begin training. Currently, users are allowed to upload either a single train file, or a train file along with an evaluation file. If an evaluation file is uploaded it must contain at least one conversation.
Create a new Fine-tuned model
Using the create_custom_model() method of the Cohere client, you can kick off a training job that will result in a fine-tuned model. Fine-tuned models are trained on custom datasets. In the example below, we create a dataset with training and evaluation data, and use it to fine-tune a model.
import cohere

co = cohere.Client('Your API key')

# Single train file upload
train_only_dataset = co.create_dataset(name="sample_train_dataset", data=open("/path/to/trainfile.jsonl", "rb"), dataset_type="chat-finetune-input")
train_only_dataset.await_validation()

# Uploading both train and eval file
train_eval_both_dataset =  co.create_dataset(name="sample_train_dataset", data=open("/path/to/trainfile.jsonl", "rb"), eval_data=open("/path/to/evalfile.jsonl", "rb"), dataset_type="chat-finetune-input")
train_eval_both_dataset.await_validation()
Data Formatting and Requirements
Please see the 'Data Requirements' section in 'Preparing the data' page for the full list of requirements.
After uploading your dataset, via co.create_dataset(), it will be validated. The dataset.await_validation() method will return a cohere.Dataset object with these properties:
validation_statuswill inform you of whether you dataset has beenvalidatedor hasfailed.validation_errorcontains any errors in the case where the validation has failed.validation_warningscontains warnings about your dataset. In the case of your dataset having more than one error, one will appear invalidation_error, and the rest invalidation_warnings.
Below is a table of errors or warnings you may receive and how to fix them.
| Error/Warning | Error/Warning Text | Meaning | Fix |
|---|---|---|---|
| Error | 'not enough valid examples: found only X valid train examples of Y received (A incorrectly encoded, B duplicated, C too many tokens); at least 2 valid examples required since no eval data was provided' | Is thrown for any incorrectly encoded or duplicated messages, as well as when turns are above the context length (in which case those turns will be dropped). | You need to upload more valid examples in your dataset for a minimum of 2 examples. |
| Error | 'train preambles are too long:..' OR 'invalid eval file: preambles are too long:..' | Is thrown when uploaded train preambles in train and/or eval data are above the context length of 2048 tokens. The error message will contain the preamble which needs to be shortened. | Shorten or upload new preambles. |
| Error | 'extra speaker in example: <extra_speaker_name> (line : X)' | This means that the uploaded training dataset has speakers which are not one of the allowed roles: System,User or Chatbot | Rename or remove the extra speaker and re-upload the dataset. |
| Error | 'missing Chatbot in example' OR 'missing User in example' | This means th euploaded training dataset is missing either Chatbot or User speaker, both of which are required. | Upload your dataset with required speakers Chatbot and User |
| Warning | 'dataset has 0 valid eval rows. dataset will be auto-split' | This error is thrown when eval data was not uploaded, in which case the dataset will be auto-split with 80% going to training and 20% to evaluation. | None |
| Warning | 'train dataset has conversations with too many tokens. conversation number: number of turns with too many tokens is as follows, x:y' OR 'eval dataset has conversations with too many tokens. conversation number: number of turns with too many tokens is as follows, x:y' | This means the train and/or eval dataset has turns which exceed the context length of 4096 tokens, and will be dropped for training. The message specifies the conversation index x (which starts at 0), as well as the number of turns which are over the context length in that conversation, y. | If you do not want any turns dropped, consider shortening turns. |
Parameters
To train a custom model, pass the following parameters to co.create_custom_model().
name(str) – The name of your custom model, which must be unique across your organization. This parameter is required.model_type(CHAT) – The type of model you want to train. This parameter is required.dataset(JsonlDataset) – A dataset with which to customize a model. This file should consist of a single training file, or both training and eval file. See our Dataset guide for more information. This parameter is required.hyperparameters(HyperparametersInput) - Adjust hyperparameters for training.train_epochs(int) The maximum number of epochs the customization job runs for. Must be between 1 and 10. Defaults to 1.learning_rate(float) The learning rate to be used during training. Must be between 0.000005 and 0.1. Defaults to 0.01.train_batch_size(int) The batch size is the number of training examples included in a single training pass. Must be between 2 and 16. Defaults to 16.early_stopping_threshold(float) How much the loss must improve to prevent early stopping. Must be between 0 and 0.1. Defaults to 0.01.early_stopping_patience(int) Stops training if the loss metric does not improve beyond the value ofearly_stopping_thresholdafter this many rounds of evaluation. Must be between 0 and 10. Defaults to 6.
Example
import cohere
from cohere.responses.custom_model import HyperParametersInput

co = cohere.Client('Your API key')

dataset = co.create_dataset(name="sample_train_dataset", data=open("/path/to/trainfile.jsonl", "rb"), eval_data=open("/path/to/evalfile.jsonl", "rb"), dataset_type="chat-finetune-input")
# optional (define custom  hyperparameters)
hp = HyperParametersInput(early_stopping_patience=6, early_stopping_threshold=0.01, train_batch_size=16, train_epochs=1, learning_rate=0.001)
ft = co.create_custom_model(name='my-finetuned-model', dataset=dataset, model_type='CHAT', hyperparameters=hp)
Calling your Chat Model with co.chat()
Once your model completes training, you can call it via co.chat() and pass your custom model's model_id.
co.chat() saves the preamble in the first conversation of your training dataset as the default preamble, with the date appended. In the example above, the default preamble would be saved as 'You are a chatbot trained to answer to my every question. Today's date is <the_current_date>'.
If there is no preamble uploaded in the first conversation of your training dataset, we will use a default preamble of 'You are an AI-assistant chatbot trained to assist human users by providing thorough responses. Today's date is <the_current_date>'. You can use a different preamble using the preamble_override parameter.
By passing return_prompt=True in any message, you can see which preamble is being used for your conversation.
Here's a Python script to make this clearer:
import cohere

co = cohere.Client('Your API key')
# get the custom model object
ft = co.get_custom_model_by_name('my-finetuned-model')

response = co.chat(
  message="Hi there",
  model=ft.model_id,
  # optional (if you want a different default preamble)
  preamble_override="You are a chatbot trained to answer to my every question. Answer every question with full sentences.",
  # optional
  return_prompt=True
)

# Printing the model's response.
print(response.text)
After your first message with the model, an id field will be returned which you can pass as the conversation_id to continue the conversation from that point onwards, like so:
# Continuing the above conversation with `response.id`.
response_2 = co.chat(
  message="How are you?",
  model=ft.model_id,
  # optional (if you want a different default preamble)
  preamble_override="You are a chatbot trained to answer to my every question. Answer every question with full sentences",
  # optional
  return_prompt=True,
  conversation_id=response.id,
)
We can’t wait to see what you start building! Share your projects or find support on our Discord.
Updated 3 days ago